CFLite old
This page documents how to build CFLite 476.10 such that you can then link to it in your Windows projects, and then blissfully use CFStrings, CFDictionaries, and all the other CFGoodness that CFLite will bring you. For a "quick and dirty" way to just start *using* CFLite on windows (without having to compile it), click here.
On Windows XP or Windows Vista:
- First, install the built binary by following The "Easy" Way instructions.
- Download ICU4C
- Download CFLite 476.13.
- Download include.zip (contains /usr/include/*, which includes AvailabilityMacros, AssertMacros and TargetConditionals from 10.5)
- Download patch_and_flsl.zip (contains the patcher and the flsl.c file)
- Install Cygwin. Follow the link for detailed instructions.
- Arrange the source files. This layout is the format that the patch understands.
- Extract CFLite to a place of your choosing. You'll need to get to the directory easily from cygwin, so make it somewhere simple. It will unzip into a folder called "CF-476.13".
- Open the "CF-476.13" directory. From now on i'll just call this "the CFLite folder".
- The patch does not yet cover the following source files and their contained features. The build process for CFLite is... unique, you'll want to move or remove these files. (A suitable Makefile would be superior)
- CFConcreteStreams.c
- CFMachPort.c
- CFMessagePort.c
- CFPlugIn_Instance.c
- CFRunLoop.c
- CFRunLoopPriv.h
- CFSocket.c
- CFSocketStream.c
- CFStream.c
- CFStringDefaultEncoding.h
- CFUserNotification.c
- CFVersion.c
- CFWindowsMessageQueue.c
- CFWindowsMessageQueue.h
- You may also delete the files CFCharacterSetBitmaps.bitmap, CFUniCharPropertyDatabase.data, CFUnicodeData-B.mapping, CFUnicodeData-L.mapping, they are already installed (from step 1)
- Unzip patch_and_flsl.zip into your CFLite folder. This will place your patcher and the flsl.c file both in that directory.
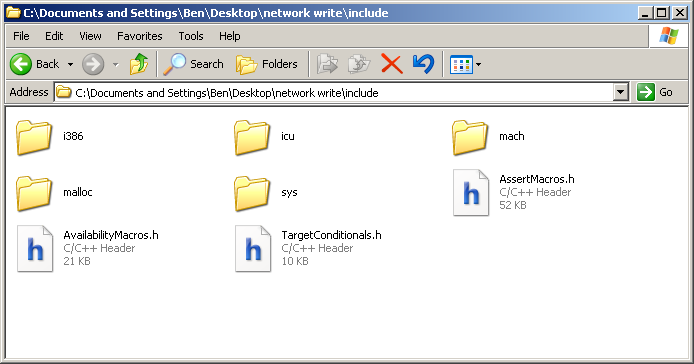
- Unzip the "Include" folder into your CFLite folder
- Unzip the ICU4C package into the Include folder. It should extract into an icu folder.
Your include folder should look like this when you're finished. (Ignore the fact that the path does not contain the word "CF-476.13", yours should)
- in your Cygwin command prompt, navigate IN to your CFLite folder (so you're seeing it's contents)
- Note: Cygwin will execute regular dos commands like dir, copy, del, or you can use their unix equivalents ls, cp, rm. Change directories with the cd command.
- Note: Cygwin maps disk drive letters to a mount point in the folder /cygdrive/. For example; /cygdrive/c/ is equivalent to C:\, and /cygdrive/m/ would be M:\ at a DOS prompt or under My Computer.
- Apply the patch. The patch is against CFLite-476.13, patching will fail with CFLite-476.10.
- Use this patch command from inside the CFLite directory.
- Use this patch command from inside the CFLite directory.
patch -p1 < cf.patch
- type this:
make 2>error_log.txt
- There are a lot of warnings.
- Your built .dll and .lib files will be installed into your \WINDOWS\CoreFoundation\ directory after being built. The directory include/CoreFoundation/ will contain the Core Foundation headers that you use for other programs, if you have modified the headers you should copy them into \WINDOWS\CoreFoundation\CoreFoundation\ yourself, or add that step into the make file.
- Using CFLite in your own programs:
- If you're using GCC
- You will need to define the preprocessor directive __WIN32__ in your build.
- Works just like using a DLL in other GCC apps.
- Make sure you use the -mno-cygwin flag to prevent gcc from linking with the cygwin dll and C runtime. Link with -lmsvcrt instead.
- Visual Studio 2005
- You followed the original instructions for "the easy way" right?
- If you're using GCC
- Download CFTest source files. This is the test harness sample project.
- You can ignore the XCode project
- create a new project in your windows dev environment and add the two .cpp files.
- the "console.txt" is the example output that it should look like in your console
- Source code changes for CFTest.exe
- CFTest.exe looks for the "test.xml" Chiquitita.xml file in its parent directory.