Code/CFLite/CFNetwork: Difference between revisions
Jump to navigation
Jump to search
No edit summary |
|||
| (31 intermediate revisions by the same user not shown) | |||
| Line 1: | Line 1: | ||
I hereby release everything here under the terms of the "[https://en.wikipedia.org/wiki/BSD_licenses#2-clause_license_.28.22Simplified_BSD_License.22_or_.22FreeBSD_License.22.29 FreeBSD License]". | |||
==If you use QuickTime on Windows, or Parallels Desktop for debugging Windows== | |||
Be very sure you [[CFLite#Cooperating_with_QuickTime|check this stuff out]], it's important. | |||
' | |||
==How to get started== | ==How to get started== | ||
#Install [http://support.apple.com/kb/DL999 Bonjour Print Services] | #if you're on Windows: | ||
#download | ##Install [http://support.apple.com/kb/DL999 Bonjour Print Services]. (you do not need to run the printer wizard nor set up a printer, this is just a service that CFTest makes use of) | ||
# | ##install [http://downloads.activestate.com/ActivePython/releases/ Python 2.7] do NOT install python 3. Python is used for post-build steps / deployment | ||
# | ## i installed [https://www.visualstudio.com/downloads/ Visual Studio Community Edition] (the free one). if you install something else, YMMV | ||
## | ## when [https://info.qt.io/download-qt-for-application-development installing Qt Open Source], be sure to install MSVC2015 32 and 64 | ||
## | #download <googa>../../../cflite/downloads/CoreFoundation.zip|CoreFoundation|/downloads/CoreFoundationInstaller</googa> (which includes CFTest with CFLite and CFNetwork) and put it in your development tree | ||
## | # using Qt (tested on 5.9.1) | ||
## | ## on Windows: open CF/opencflite-476.17.2/Qt/CFLite/CFLite.pro. | ||
## | ## you SHOULD be able to use the .user file, cuz all paths are relative, so if it asks if you want to "take over" that file, even though it was created on another machine, go ahead | ||
## open CFTest/project/qt/CFTest/CFTest_win.pro (do the same thing, take over that file if it asks) | |||
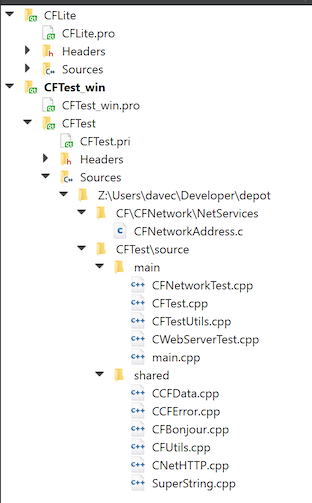
## your "Session" should look like this: (on Mac you will not see CFLite )<br>{{SERVER}}/cflite/screenshots/qt_session.png | |||
## on Windows: | |||
### set CFTest_win/mac to the active project, use the 64bit one | |||
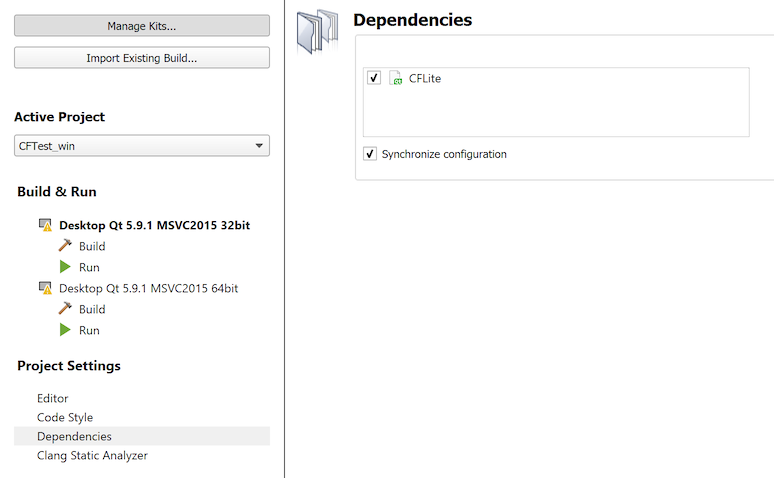
### set it to depend on and sync with CFLite, like this:<br>{{SERVER}}/cflite/screenshots/qt_session_dependencies.png | |||
## below screen shots show 64bit debug as an example, (on mac they'll show "clang" instead of "MSVC2015") you can optionally set up 32bit debug, and also release of both 32 and 64. Note mac doesn't have 32bit. | |||
## Windows: how CFLite build settings should look: (ignore run settings)<br>{{SERVER}}/cflite/screenshots/qt_build_cflite.png | |||
## how CFTest build settings should look:<br>{{SERVER}}/cflite/screenshots/qt_build_cftest.png | |||
## how CFTest run settings should look:<br>{{SERVER}}/cflite/screenshots/qt_run_cftest.png | |||
# if you're using Visual Studio | |||
## Open the file "CFNetwork/CFTest/win_vs/CFTest.sln". | |||
## go to "Solution Explorer" | |||
## select "CFTest", right click it and pick "Properties" | |||
## in the "Configuration:" menu, pick "All Configurations" | |||
## go to "configuration properties->debugging" | |||
## set "Command" to "$(SolutionDir)build\$(TargetName).app\Contents\Windows\$(TargetFileName)". | |||
## in VS2010 and later, actually you may need to just specify the full path (in step 4 above), as "$(TargetName)" does not seem to expand correctly for debug vs. release | |||
Latest revision as of 16:48, 10 August 2017
I hereby release everything here under the terms of the "FreeBSD License".
If you use QuickTime on Windows, or Parallels Desktop for debugging Windows
Be very sure you check this stuff out, it's important.
How to get started
- if you're on Windows:
- Install Bonjour Print Services. (you do not need to run the printer wizard nor set up a printer, this is just a service that CFTest makes use of)
- install Python 2.7 do NOT install python 3. Python is used for post-build steps / deployment
- i installed Visual Studio Community Edition (the free one). if you install something else, YMMV
- when installing Qt Open Source, be sure to install MSVC2015 32 and 64
- download CoreFoundation (which includes CFTest with CFLite and CFNetwork) and put it in your development tree
- using Qt (tested on 5.9.1)
- on Windows: open CF/opencflite-476.17.2/Qt/CFLite/CFLite.pro.
- you SHOULD be able to use the .user file, cuz all paths are relative, so if it asks if you want to "take over" that file, even though it was created on another machine, go ahead
- open CFTest/project/qt/CFTest/CFTest_win.pro (do the same thing, take over that file if it asks)
- your "Session" should look like this: (on Mac you will not see CFLite )
- on Windows:
- set CFTest_win/mac to the active project, use the 64bit one
- set it to depend on and sync with CFLite, like this:
- below screen shots show 64bit debug as an example, (on mac they'll show "clang" instead of "MSVC2015") you can optionally set up 32bit debug, and also release of both 32 and 64. Note mac doesn't have 32bit.
- Windows: how CFLite build settings should look: (ignore run settings)

- how CFTest build settings should look:

- how CFTest run settings should look:

- if you're using Visual Studio
- Open the file "CFNetwork/CFTest/win_vs/CFTest.sln".
- go to "Solution Explorer"
- select "CFTest", right click it and pick "Properties"
- in the "Configuration:" menu, pick "All Configurations"
- go to "configuration properties->debugging"
- set "Command" to "$(SolutionDir)build\$(TargetName).app\Contents\Windows\$(TargetFileName)".
- in VS2010 and later, actually you may need to just specify the full path (in step 4 above), as "$(TargetName)" does not seem to expand correctly for debug vs. release